I don’t know if it’s the stress of the past very hectic work week, or just that enough time has passed since we said goodbye, but this week, the loss of my big dog Zeus seemed to become more acute.
I wanted to share something here that I thought others might find useful, something that will help you make a tangible memory of your pet (or loved ones of all kinds, actually). I couldn’t find a lot of specific instructions for this online (there are plenty of sites selling kits for this but not instructions for doing it without a prefab kit).
For years I had wanted to make a cast of Zeus’s enormous paws, but I had tried to do it a few years ago without success. Rather unlike myself, I gave up, convinced that it wasn’t going to work. As the day to say goodbye approached I felt more resolved to figure this out. Chris shared with me something in a work newsletter about the hospital making casts of terminally ill patients’ hands as a way to give their family members a lasting, tangible memory, especially for young children (Chris is a registered nurse). I suddenly realized that I had a whole army of resources at my work, who could help (I work — and studied — at the Ontario College of Art & Design). Why hadn’t I thought of this before?
The first time I had attempted to do the cast I bought one of those kits at the art supply store, the kind for casting a small child’s hand. First problem was that there was not enough material to make a good mold. The second problem was that the mold-making material got all stuck in his fur — it was a nasty, awful mess. I had made plaster casts before in art school, and of course Vaseline was used to prevent hair from sticking. But for whatever reason I just gave up on the idea.
But this time around I decided that I would try, try again. The woman at the hospital who did the casting of the patients’ hands told us she used dental alginate (a biodegradable, non-toxic material created from seaweed) to make the mold. You can get it in different forms — some that set slowly and others that set more quickly. The longer setting types are better for casting people parts, since you can instruct a person to hold still for however long. But for pets, I suggest getting an alginate that sets in 2 to 3 minutes.
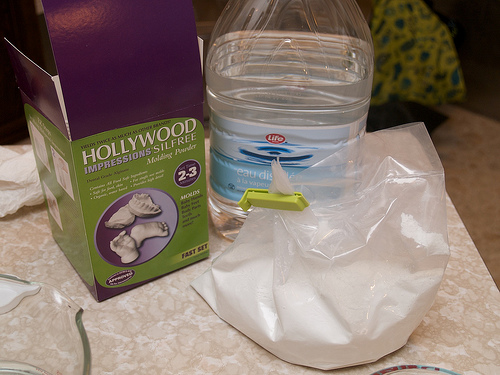
You can get this stuff at any good art supply store. We made several casts — three pairs of paws actually (six molds and casts), in our attempts to get it right. One box of the stuff costs about $17, and we ended up using two. The other thing you should know before you start is that unlike some mold-making materials, alginate makes only a one-time-use mold. It also needs to have the cast material poured into it within two hours after making the mold, because the alginate shrinks as it dries. The easiest-to-use material for making a cast is Plaster of Paris, also available at most art supply stores, for about $4/1 kg box.
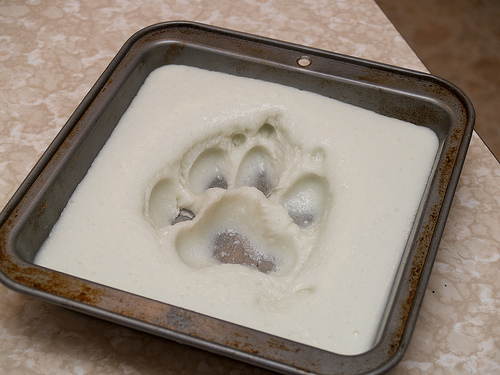
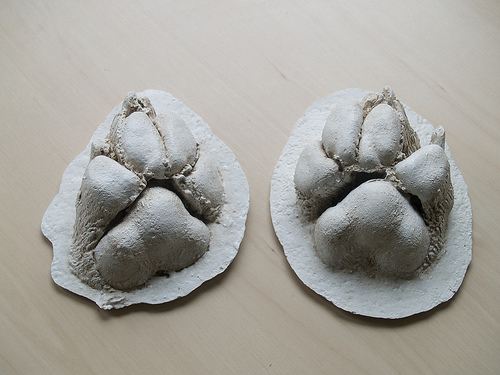
I suggest using a deeper container for making your mold than the cake pan pictured above. As you can see, Zeus’s paw sunk all the way to the base. This didn’t make for the best cast. The final product pictured at the top of this post was made in a different container, about four inches deep (we forgot to take pictures as we were doing those later molds and casts).
It will likely be easiest if you have someone helping you because you have to work quickly with the fast-setting alginate. While I mixed up the alginate, Chris would lube up Zeus’s paw with Vaseline. THIS IS KEY to the whole process. The Vaseline prevents the dog’s hair from sticking to the alginate. I also advise using old towels or drop sheets in your work area, and unless you have a small dog you can carry in your arms and hold, have the dog lay down where they are comfortable. They’ll have to be still for about 3 or 4 minutes, and remain still as you ease the paw out of the mold after it sets. We spilled a bit of alginate on one attempt and that stuff, it does NOT come out. While it may be biodegradable and so on, it seems to be very permanent if it gets onto something while it’s still liquid.
The alginate sets more quickly the hotter the water you use. I found using hot but not scalding water worked very well (it cooled enough for the dog’s paw by the time you put it in the alginate), but you have to work super fast, so water that’s slightly more than warm may be better for you (having it quite hot means it may begin setting before you get the paw into it — this nearly happened to us on one attempt). Using a whisk, whip up the porportion of water and alginate recommended on the package. The better you mix it, the better it will set, and the better detail you’ll get in the final mold (and fewer air bubbles). Working quickly, pour the alginate into your mold container and then go stick your pet’s lubed up paw into the material. HOLD EVERYTHING STILL for the recommended period of time — in my cast it was about 3 minutes. You can push the paw in as deeply as you want but you need to avoid touching the sides of the container, and avoid getting the alginate on parts of the dog that are not lubed with Vaseline. The deeper you push it in, the more challenging it may be to ease it out again without tearing the delicate alginate.
You can test how well set it the mold is by pushing on the surface. It will be rubbery and you won’t be able to make an impression in it when it is sufficiently set. Gently pull away the edges of the mold from your pet’s paw, to release the mold. There were a couple times when we tore a significant piece of the mold away as we did this, parts that stuck between Zeus’s big toes, but I found I could put them back in place by pushing a toothpick through them to anchor them back in the mold where they belonged, so that I could still make a good cast. This might be harder with a smaller paw, but then again, you probably won’t experience the same problems I had with a tinier paw. After removing the paw from the mold, wipe away the Vaseline as much as possible from your pet’s paw. Don’t worry — if they ingest any by licking the paw, it won’t harm them.
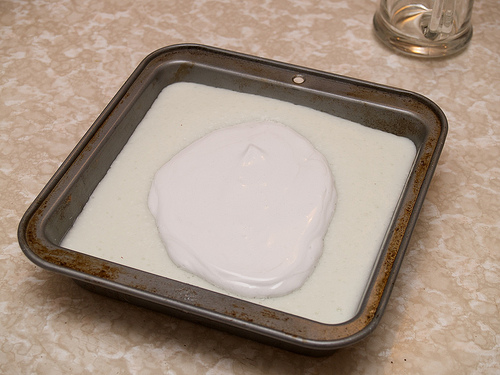
Next step is to make the cast. Mix up the Plaster of Paris as per the directions on the package. Use more of the dry plaster than you think you need — it seems to shrink as you add the water and it doesn’t work as well if you have to adjust your amount later. Again, work quickly. Mix and pour as quickly as you can, taking care to ensure the plaster fills all the “wells” of the mold. You can gently tap the mold on the counter to help it settle and to force out air bubbles.
Allow the mold and cast to sit overnight. Plaster of Paris sets faster than this, but I wasn’t confident enough to remove the mold until the next day. Don’t be surprized to find water has settled around the alginate in the container — this is part of what happens as the alginate starts to dry and shrink. The plaster cast will still be very damp but it will be very well set. It can be left on a baking rack to allow to dry completely. I found this took several days to a week to be fully dry. Put your used alginate mold into the green bin or composter for disposal.
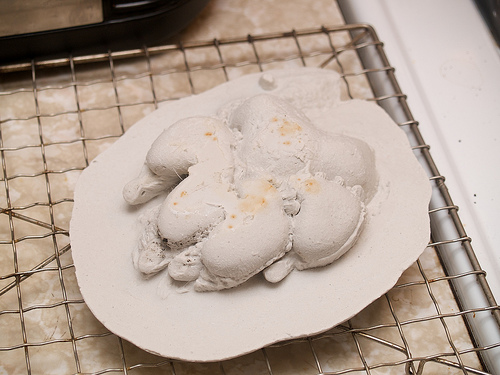
Once the cast is dry, you can use a fine sandpaper to carefully sand away any air bubbles or other imperfections, being careful not to sand away any desirable detail. I found that some of the casts we did had more air bubbles (from the mold) than others — I’m guessing because I hadn’t mixed the alginate as well. This is why it’s a good idea to have enough of your raw materials to do this a few times, to allow you to get it right. Being careful not to breath in the plaster dust, blow away any dust particulate from the cast.
The final step is to paint and/or seal the cast. Not doing this leaves your plaster cast sensitive to humidity, which could damage it. You can paint the cast white using an acrylic (water-based) paint. You can stop at this step, or, if you’re more adventurous, adding a coat of clear acrylic varnish tinted with a brown (I used the colour “raw umber”) will help highlight the detail. To do this, use a hog’s hair brush (more durable and stiff) to push the tinted varnish into the crevices. Then, right away, use a damp paper towel to wipe away the surface, allowing the darker colour to stay in the crevices but clearing it off the highlights. If this is the first time you’ve tried this technique, start with a less obvious area of the cast to practice, and play. It may help you to get an acrylic retarder product — adding a drop or two of this to your paint will slow the drying time and give you considerable more time to work (acrylic paint dries very fast, and is entirely permanent). This last step will give the cast a nice shine and a finished look, with great detail. If you prefer, you can also get a matte varnish instead of a gloss (less shine).
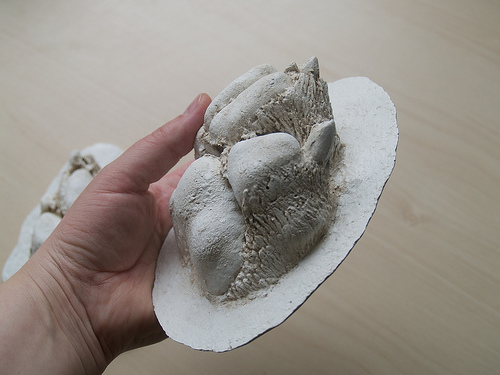
I plan to take the best casts of Zeus’s paws and have them mounted in a shadow box frame, with a photo of Zeus and possibly his collar. I have debated about including the collar but I’ve been told you can get shadow boxes that open, which allows you to remove objects if you want to. I want to be able to take the collar out and handle it once in a while. The casts are also quite tactile and nice to hold and look at from all angles, so I’m really pleased we did a few of them — I can keep the extra ones in a memory box with his leash and tags, and some other items.
Did you find a suitable shadow box or frame? I don’t think pins will hold up the plaster, which is all I could find at Michael’s. I am looking for something to put a paw print into…my dog just passed away a few days ago 🙁
Hi Jen,
I’m so sorry to hear about your dog. I’m still having a tough time with losing my guy. Sometimes I hear people say they never want to get a dog because they eventually die, and yes, it is hard, but I think the experience of that unconditional love and adoration is so worth it.
I haven’t found a suitable frame yet for the paws. I have found the shadowboxes that Micheal’s carries but I don’t think they are quite big enough or deep enough to work for me (and I want to be able to open it to). In hindsight I wish I had embedded a little hook in the plaster, but I think using epoxy to attach something should work too (and maybe even be stronger than embedding). Then I could either hang them on their own or hang them in a shadowbox with a strong backing, probably wood. I still may take them (with his collar) to a professional to have something custom made. St. Bernard paws and collars are just so big!
In the meantime we have framed the photo I had enlarged of Zeus and it hangs just above where his bed used to be, in our living room.
Hang in there and let me know if you find something that works for your paws.
Best-
Sarah
Thank you for posting this information it was very helpful and It was real easy. I am so impressed with our out come. Our Bailey will be laid to rest on Monday after 13 fantastic years and I am so happy to have found your information. Thank you! God bless